That is the best RMH drawing I've ever seen. I love it!
I have a masonry chimney as well. Oddmar, I think your explanation is correct and does a good job of explaining why my stove can be trouble if I let everything cool off. However, there's a flip side to that. Once you warm that masonry chimney, it starts working for your draft. I can start up after a weekend away and the thing pulls like crazy, you actually can feel the draft when you hold your hand over the feed before lighting the stove. The trick is to get it pulling at first so you can get the heat into that masonry chimney. I use a candle in my wall thimble for a while before I light the heater in the fall, and try to do my first start in the right conditions. After a warm day, so the house is fairly warm, but on a night when the air has cooled quickly. After that though, as long as I burn once every third day or so, I'm good.
My neighbor's RMH has a fairly long vertical section of uninsulated pipe, and he spends a lot of time away from home so often does cold starts. He has to be really careful or he can easily create a "smoke plug" like you describe. I am keeping my eyes open for cheap used insulated flue pipe for him, but man, that stuff is crazy expensive. I found some at a salvage place and they still wanted $18/ft or some such.
6" RMH Build
Moderator: matt walker
Re: 6" RMH Build
![]() by matt walker » Tue Aug 27, 2013 4:43 am
by matt walker » Tue Aug 27, 2013 4:43 am
-

matt walker - Site Admin
- Posts: 1806
- Joined: Tue Jan 03, 2012 5:50 pm
- Location: North Olympic Peninsula
Re: 6" RMH Build
![]() by Oddmar » Tue Aug 27, 2013 4:50 am
by Oddmar » Tue Aug 27, 2013 4:50 am
Here's your insulated pipe...
Quoting that weirdo Oddmar, several posts back...
"I packed cellulose insulation between my 8" exhaust ducting and a homemade 10" duct to keep the cold outside air from chilling the exhaust pipe above the roof, cause i got sticker shock when i looked at insulated stovepipe prices in my local hardware store."
The cellulose is fireproffed, and packed down between two pieces of ductwork the oxy can't get to it anyway. The exhaust temps at that stage are cool enough for it to be safe. I mean, that's why we're trying to use insulated pipe anyway, right?
Darrell "Jake" Jacob, Oddmar on all the forums, KC9PZN to all you amateurs.
-

Oddmar - Posts: 56
- Joined: Sun May 27, 2012 3:08 pm
- Location: Near Arkadelphia, Arkansas
Re: 6" RMH Build
![]() by matt walker » Tue Aug 27, 2013 4:56 am
by matt walker » Tue Aug 27, 2013 4:56 am
Good stuff there Oddmar. I'll pass that on for sure.
-
matt walker - Site Admin
- Posts: 1806
- Joined: Tue Jan 03, 2012 5:50 pm
- Location: North Olympic Peninsula
Re: 6" RMH Build
![]() by pa_friendly_guy » Tue Aug 27, 2013 12:46 pm
by pa_friendly_guy » Tue Aug 27, 2013 12:46 pm
Interesting discussion. I didn't know that you could rob so much heat from the stove that it would stop the draft. You were correct Matt when you described my idea as a floor register, it would simply be a separate 4" pipe covered with the cobb and exiting on the 2nd floor to provide an easy way to transport heat to where it was needed. I suppose that it would add to the concern of taking so much heat that it could effect the draft. Trying to make the stove heat too much space, or too much water could be compared to trying to steer the Queen Mary with a row boat. It just ain't gonna work too well. 
PS I still like the idea of a floor register to get the heat where it is needed. You could even run the register pipe along a joist to get the heat to another room, or across the house from the heater.
PS I still like the idea of a floor register to get the heat where it is needed. You could even run the register pipe along a joist to get the heat to another room, or across the house from the heater.
Never doubt that a small group of dedicated people can change the world, indeed it is the only thing that ever has.
-

pa_friendly_guy - Posts: 1502
- Joined: Sun Jan 08, 2012 9:24 pm
- Location: SW Pa They changed me to zone 6a what ever that is. I still figure zone 5
Re: 6" RMH Build
![]() by mannytheseacow » Tue Sep 03, 2013 2:34 am
by mannytheseacow » Tue Sep 03, 2013 2:34 am
I just have to say, it was 70 something today and it's getting down toward 50* tonight. I started the RMH up and I'm sitting next to it right now. It's not only running like a dream, but I'm friggin HOT. I'm going to let it burn out and call it a night.
"Knowledge is power. Arm yourself."
-

mannytheseacow - Posts: 942
- Joined: Sun Feb 24, 2013 12:40 am
Re: 6" RMH Build
![]() by matt walker » Tue Sep 03, 2013 3:11 am
by matt walker » Tue Sep 03, 2013 3:11 am
Hahaha! Get used to it Manny. You're in for a warm winter my friend.
-
matt walker - Site Admin
- Posts: 1806
- Joined: Tue Jan 03, 2012 5:50 pm
- Location: North Olympic Peninsula
Re: 6" RMH Build
![]() by pa_friendly_guy » Tue Sep 03, 2013 1:41 pm
by pa_friendly_guy » Tue Sep 03, 2013 1:41 pm
I hope it holds up to the winter. Glad it is working well. Keep trying it out while it is warmer so you can see how it works.
Never doubt that a small group of dedicated people can change the world, indeed it is the only thing that ever has.
-
pa_friendly_guy - Posts: 1502
- Joined: Sun Jan 08, 2012 9:24 pm
- Location: SW Pa They changed me to zone 6a what ever that is. I still figure zone 5
Lovely business Manny
![]() by Prescott » Sat Sep 21, 2013 3:17 am
by Prescott » Sat Sep 21, 2013 3:17 am
I have seen your name around but finding it here with all your progress is marvelous! So beneficial seeing your process, mine is building so much proverbial steam, and your excellent thoughts, ideas, trials and documentation fans the fire!
As I begin my own build I'll create my own thread (here and ala donkeyboards) in case it is worth anything to anyone. I'll be looking for feedback and guidance along the way!
Speaking of which, what were your final dimensions of your casted core (in and out, if you recall)? I too am going with a 6" flue and 5 3/8 opening. I tweaked all the measurements in scale the other night and then noticed Matt W told you to just squeeze the CSA down, leaving the depth of the feedtube/burntunnel the same as the 8".
What sort of temps did you read on the outside of the core when you burned it?
I'm not using cob (unless I find/procure some serious clay soon!) and so being very mindful of insulation and structural integrity. While my core is sitting on a slab, it has radiant floor tubing in it (of course to be fed by the rocket) and I want to be very sure I don't mess with that!
- Prescott
- Posts: 37
- Joined: Fri Sep 20, 2013 1:18 am
- Location: Washington County, Maine
Re: 6" RMH Build
![]() by mannytheseacow » Sat Sep 21, 2013 5:48 pm
by mannytheseacow » Sat Sep 21, 2013 5:48 pm
HI Prescott! Thanks for checking out my build! I'm stoked that my posts are beneficial to you. I feel like I was usually posting to get advice from the experts but now that I'm working through my build, it probably is great for other people to see. All of Matt's pictures, videos, and information have been super helpful to me, and I'm also really excited seeing Ray's build come along, and Oddmar's was an inspiration to me, too. Not to mention, please post all the progress on your build because I can't wait to see what you have coming! I really love how everyone's RMH has a personality of its own.
As for cob, don't put too much thought into it. It's not hard, and I'm sure you have some dirt around that will be just fine.
I cast my core just the same as Matt did in his cast-core video. The dimensions for my outer form were 13.75" wide x 33" long x 13.5" deep. The inner J-tube form just fit those dimensions to make a 5 3/8" opening when the plywood form burned away and keep about 4" of insulation all the way around it. Having gone through the process now, I would make the inner form slightly larger to account for shrinkage. My current opening size after drying and firing is about 5-5 1/4 square.
I can't tell you much about temps on the outside of the core. All I know is that it was about 20* outside, I could feel the blast of heat coming off of the core from 5 foot away and it was comfortably warm to the touch around the core and by no means hot.
I also did something weird when I built the feed tube, I added brick at the entrance, but then also buried my core about 4" into the bench. I set another layer of brick on end above the original feed tube opening, with those dimensions being 7 1/2 square. I don't know if this affects the way it burns, and I don't really know why I did this, but it seems to work just fine, and I tend to run the feed choked down a bit anyway. Here's a pic looking down on it:
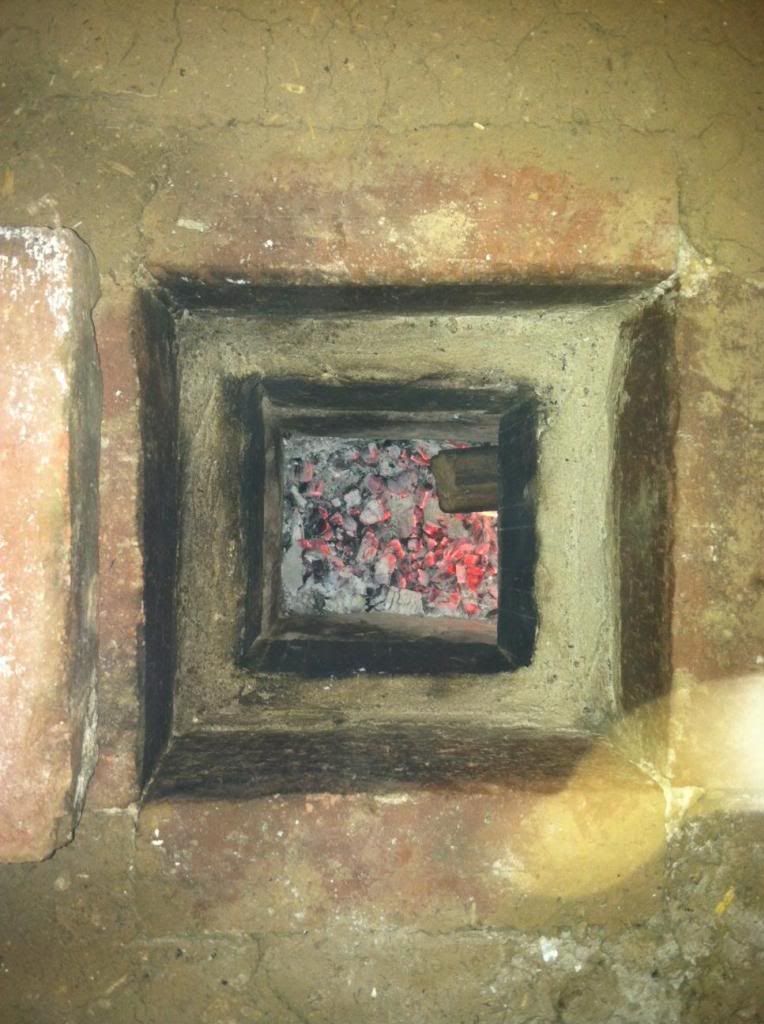
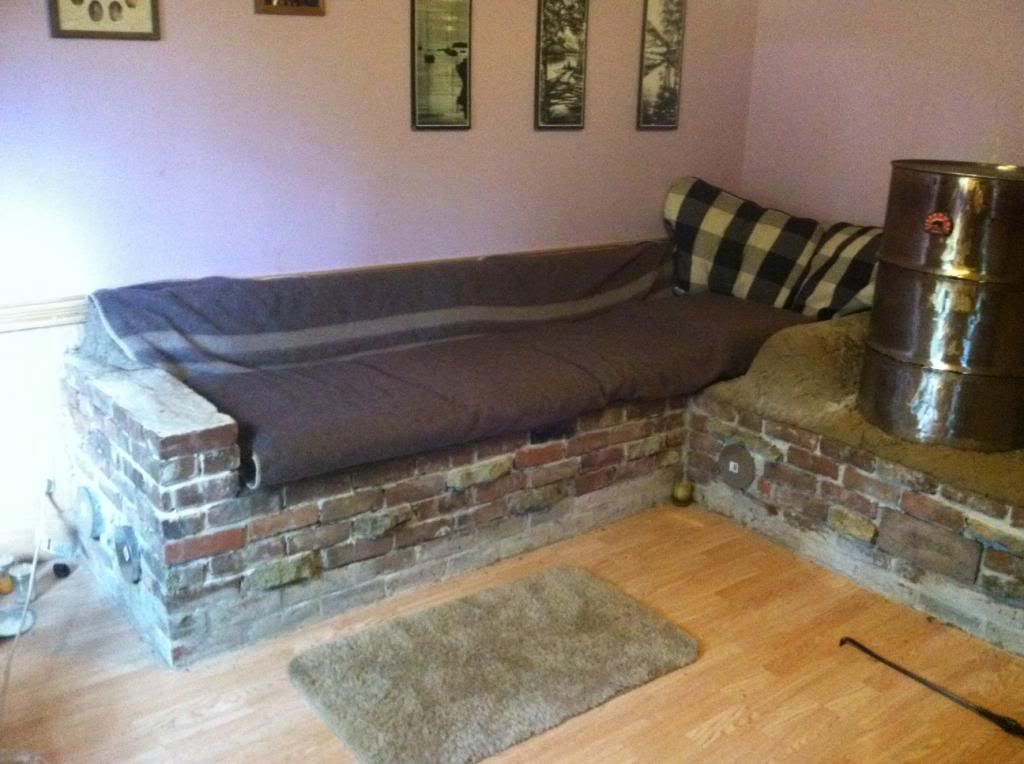
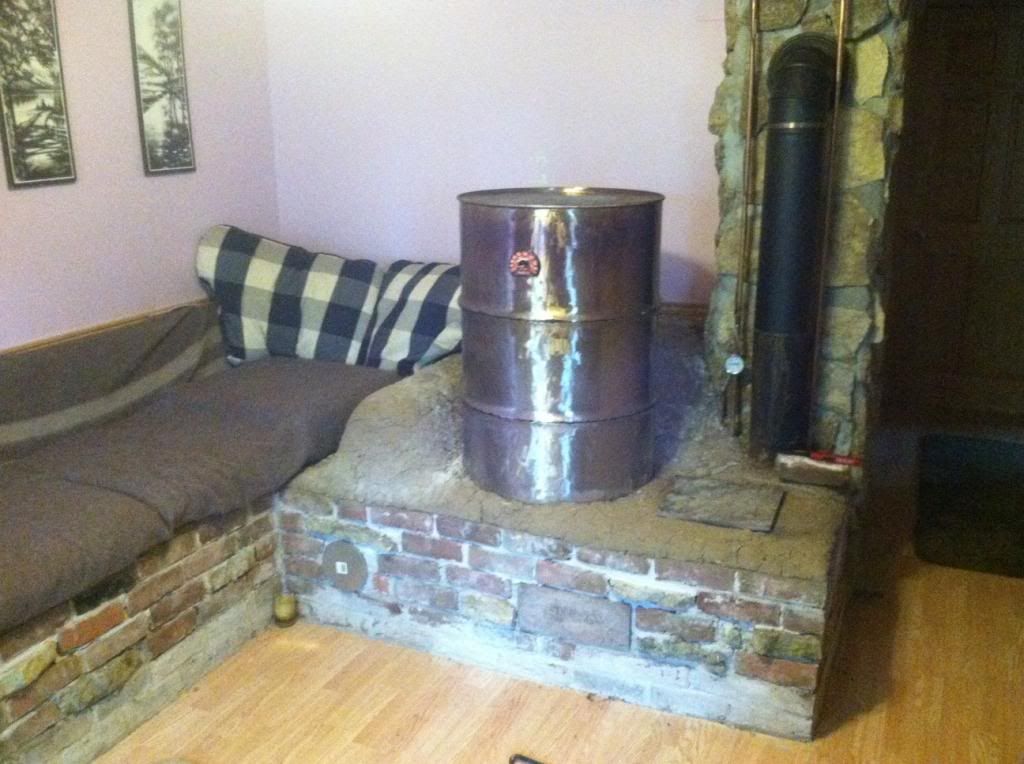
While I'm at it, here's some pics of how the system looks now. I still need to plaster it, but I'm pretty busy and that is so low on my list of priorities. At some point I might tuck point the brick too. Maybe.
As for cob, don't put too much thought into it. It's not hard, and I'm sure you have some dirt around that will be just fine.
I cast my core just the same as Matt did in his cast-core video. The dimensions for my outer form were 13.75" wide x 33" long x 13.5" deep. The inner J-tube form just fit those dimensions to make a 5 3/8" opening when the plywood form burned away and keep about 4" of insulation all the way around it. Having gone through the process now, I would make the inner form slightly larger to account for shrinkage. My current opening size after drying and firing is about 5-5 1/4 square.
I can't tell you much about temps on the outside of the core. All I know is that it was about 20* outside, I could feel the blast of heat coming off of the core from 5 foot away and it was comfortably warm to the touch around the core and by no means hot.
I also did something weird when I built the feed tube, I added brick at the entrance, but then also buried my core about 4" into the bench. I set another layer of brick on end above the original feed tube opening, with those dimensions being 7 1/2 square. I don't know if this affects the way it burns, and I don't really know why I did this, but it seems to work just fine, and I tend to run the feed choked down a bit anyway. Here's a pic looking down on it:
While I'm at it, here's some pics of how the system looks now. I still need to plaster it, but I'm pretty busy and that is so low on my list of priorities. At some point I might tuck point the brick too. Maybe.
"Knowledge is power. Arm yourself."
-
mannytheseacow - Posts: 942
- Joined: Sun Feb 24, 2013 12:40 am
Re: 6" RMH Build
![]() by matt walker » Sat Sep 21, 2013 6:57 pm
by matt walker » Sat Sep 21, 2013 6:57 pm
Okay Manny, that is just freaking awesome right there. How come you and Ray are holding out on us? You've been sitting on this basically done RMH and didn't show us immediately? Come on man! Seriously though, it's great to see it come together.
How is the dry out coming along? Is the grass all dried out and gone yet? Can you sit on it without getting damp drawers? Are your windows still fogged up?
How is the dry out coming along? Is the grass all dried out and gone yet? Can you sit on it without getting damp drawers? Are your windows still fogged up?
-
matt walker - Site Admin
- Posts: 1806
- Joined: Tue Jan 03, 2012 5:50 pm
- Location: North Olympic Peninsula
Who is online
Users browsing this forum: No registered users and 13 guests