I'm working a little more on my RMH build over the weekend. The walls of the home are insulated 2x6 studs covered with oak on the interior and I'm concerned with the heat from the bench getting too hot against it.On the backside of the bench I'm framing out a 2" gap along the walls for air space, using rough cut 2 x 2 walnut and then sheeting that with cement board. I just want to double check out there... will this be good enough?
I also have some extra zonolite (perlite). I was thinking I could fill that 2" space behind the original walls and the durock with zonolite. Any thoughts out there on which would be better?
6" RMH Build
Moderator: matt walker
Re: 6" RMH Build
![]() by matt walker » Sun Jun 23, 2013 5:17 pm
by matt walker » Sun Jun 23, 2013 5:17 pm
I think either would work Manny, as long as we are not talking about the burn chamber. I would probably start with an air gap and leave it open so you could monitor temps back there. Once you were confident it was staying cool you could finish it off. The extra perlite could be mixed into some cob and used to build the side of the bench closest to the walls to help slow heat transfer that direction. I don't believe the sides of the bench will ever be very hot, so I'm sure whatever precautions you take should be fine.
-

matt walker - Site Admin
- Posts: 1806
- Joined: Tue Jan 03, 2012 5:50 pm
- Location: North Olympic Peninsula
Re: 6" RMH Build
![]() by mannytheseacow » Sun Jun 30, 2013 5:32 pm
by mannytheseacow » Sun Jun 30, 2013 5:32 pm
Yeah, I agree, Matt. I think I'll just leave it open for the time being and decide later once the stove gets some firing time on it.
Following up on the cracked core from another post that I put in your "cast-core" thread, I got the core in place dug into it- you were exactly right. The clay shrank as it dried and the bricks stayed the same so essentially the whole front of the core cracked off from the back. I pulled back the feed tube area and removed the bricks. I mixed up a wet paste of fire clay and zonolite with an extra heavy dose of fire cement and "glued" the core back together and replaced the bricks at the feed tube area. With the core in place I started encasing it into the bench to hold it together in the meantime.
I'd rather be working on this closer to burn season so I can dry it out sooner, but we've had a really wet summer here and... quite frankly I just can't get much done outside. So, make hay when the sun shines, I guess!
Thanks again for all the help! I'll keep posting on the build as it comes along.
"Knowledge is power. Arm yourself."
-

mannytheseacow - Posts: 942
- Joined: Sun Feb 24, 2013 12:40 am
Re: 6" RMH Build
![]() by matt walker » Tue Jul 02, 2013 5:42 pm
by matt walker » Tue Jul 02, 2013 5:42 pm
Right on Manny, glad to hear it's moving forward. I totally agree about building when you can burn. It's a bit counter-intuitive until you've built one and seen how much moisture you bring into the house. It is really nice to get the thing set up and flue in place and then be building the bench while you burn it dry in stages. Nonetheless, make hay while the sun shines is a good motto.
-
matt walker - Site Admin
- Posts: 1806
- Joined: Tue Jan 03, 2012 5:50 pm
- Location: North Olympic Peninsula
Re: 6" RMH Build
![]() by mannytheseacow » Sat Jul 06, 2013 3:30 pm
by mannytheseacow » Sat Jul 06, 2013 3:30 pm
I'm making slow progress on my RMH build. I got the backing cement board up on the wall with a 2" air space behind it. I had to buy the cement board but the 2" spacers came from some walnut logged off of my property. I'm thinking I am going to make some kind of walnut vent cover strip for the top to keep the inevitable menagerie of things from getting dropped back there.
Keeping true to my goal of having a good story for everything in my house- the bricks for the surrounding wall came from a historic building from the early 1800s in my area. The building was demolished a few years ago for the onslaught of development and I salvaged what I could from it. The bricks are kinda fragile but I think they'll be ok. Some of the ductwork was salvaged too, but some of it I had to buy. I have the ductwork in place and have started backfilling the bench.
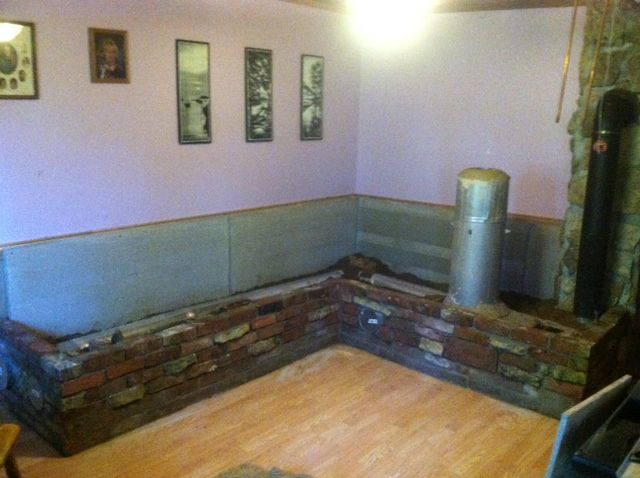
I've still got to run the water lines through the bench and get quite a bit more fill. Once the fill is up to the level of the brick at the end farthest from the core I'm planning to build a brick armrest up to the height of the back wall, or maybe somewhere in between. Probably not comfortable for one's arm, but at least somewhere to set one's tea on a sleepy winter day. There is about 23' of duct work in the bench and the bench is coupled to the cement floor below it. The exit duct enters the wall into a cement column that rises 16' vertically through the center of the house. My old stove used to heat this column and the walls surrounding the column on the second level of the house were always fairly warm. I might lose some of this heat on the second level now with the bench but I think it will be ok. My main goal is just to remove as much heat as I can from the exhaust. The column terminates at the ceiling level of the second story and just a simply 6" stove pipe goes through the attic and exits the roof. The column is insulated from above with 30+ inches of fiberglass insulation. Having this cement column in the core of my house is awesome, but it's also the limiting factor with the dimensions of my core causing the 6" cross section instead of 8" which I would prefer.
I just finished the heat riser last night.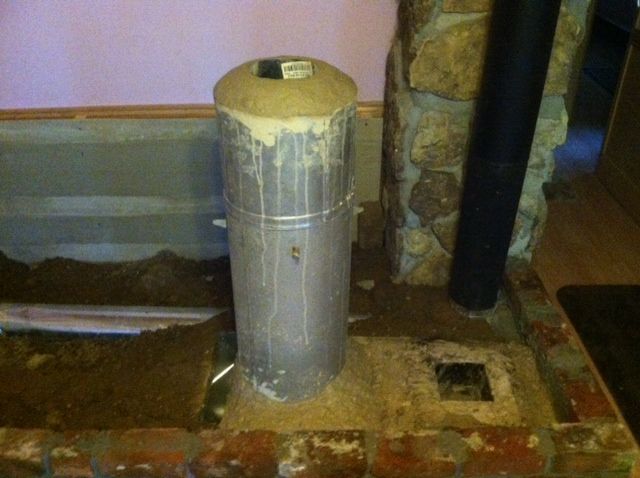 The center tube is 6" and the outer pipe is 12" giving a solid 3" of fireclay/perlite/fireplace cement all the way through.
I've got some tuckpointing to do on the brick yet but I might save that for over the winter. On second thought I might want to do it before heating the bench so the mortar doesn't dry too quick. Anyway, my main priority is getting the water pipe laid in at this point and finishing filling the bench.
I'm looking for some input on finishing the surface. Anyone out there have some tips or recommendations on how to get that nice smooth surface with no cracks? And how about tinting it? I've read about using clay and linseed oil. Also about using plaster- but I'd like some info on what works long term and recipes for the mix.
Keeping true to my goal of having a good story for everything in my house- the bricks for the surrounding wall came from a historic building from the early 1800s in my area. The building was demolished a few years ago for the onslaught of development and I salvaged what I could from it. The bricks are kinda fragile but I think they'll be ok. Some of the ductwork was salvaged too, but some of it I had to buy. I have the ductwork in place and have started backfilling the bench.
I've still got to run the water lines through the bench and get quite a bit more fill. Once the fill is up to the level of the brick at the end farthest from the core I'm planning to build a brick armrest up to the height of the back wall, or maybe somewhere in between. Probably not comfortable for one's arm, but at least somewhere to set one's tea on a sleepy winter day. There is about 23' of duct work in the bench and the bench is coupled to the cement floor below it. The exit duct enters the wall into a cement column that rises 16' vertically through the center of the house. My old stove used to heat this column and the walls surrounding the column on the second level of the house were always fairly warm. I might lose some of this heat on the second level now with the bench but I think it will be ok. My main goal is just to remove as much heat as I can from the exhaust. The column terminates at the ceiling level of the second story and just a simply 6" stove pipe goes through the attic and exits the roof. The column is insulated from above with 30+ inches of fiberglass insulation. Having this cement column in the core of my house is awesome, but it's also the limiting factor with the dimensions of my core causing the 6" cross section instead of 8" which I would prefer.
I just finished the heat riser last night.
The center tube is 6" and the outer pipe is 12" giving a solid 3" of fireclay/perlite/fireplace cement all the way through. I've got some tuckpointing to do on the brick yet but I might save that for over the winter. On second thought I might want to do it before heating the bench so the mortar doesn't dry too quick. Anyway, my main priority is getting the water pipe laid in at this point and finishing filling the bench.
I'm looking for some input on finishing the surface. Anyone out there have some tips or recommendations on how to get that nice smooth surface with no cracks? And how about tinting it? I've read about using clay and linseed oil. Also about using plaster- but I'd like some info on what works long term and recipes for the mix.
"Knowledge is power. Arm yourself."
-
mannytheseacow - Posts: 942
- Joined: Sun Feb 24, 2013 12:40 am
Re: 6" RMH Build
![]() by matt walker » Sat Jul 06, 2013 4:23 pm
by matt walker » Sat Jul 06, 2013 4:23 pm
Manny, that is flat out awesome. Very nice work you are doing there. You are going to have a great winter on that bench!
As for finish, I have had the best luck with a homemade natural plaster using my same clay, which I strain/sift to get all the grit out. Then add sand as needed to get a nice plaster. Adding some cow/horse manure adds very fine masticated fiber for strength, and I've had great luck adding flour paste as a binder to keep it from being dusty once it dries. For color, concrete colorants which are typically ferrous oxides and such, work very well. I'd personally stay away from any oils or the like, partly because I don't trust them to stay set when the clay is warm and I suspect they might stain or smell, but also because you may continue to modify it slightly or change the topcoat color over time and oil will hinder your ability to add more clay/cob/plaster.
One thing I found is that I ended up not really ever doing a nice finish on the bench top because it is always covered with cushions/blankets. It's like the part of the couch under the cushions, so you might not need to sweat the finish too much in practice. I believe covering the bench is crucial for best operation of these things. By insulating the top you build much higher temps in the mass and in that way can "charge your battery" much higher, and get longer heating cycles per burn. At least, that's been my experience, and that's my theory about that! I actually think that a nice wool blanket over the whole thing speeds the drying exponentially, contrary to what you might think, since it keeps the temps up but the water transpires right through the blanket.
-
matt walker - Site Admin
- Posts: 1806
- Joined: Tue Jan 03, 2012 5:50 pm
- Location: North Olympic Peninsula
Re: 6" RMH Build
![]() by matt walker » Sat Jul 06, 2013 4:26 pm
by matt walker » Sat Jul 06, 2013 4:26 pm
Now that I'm looking at your photo again I'm wondering about your transition from barrel to mass flue run. Have you figured the CSA of that plenum you have there? That spot needs to be as big as possible as I'm sure you are aware.
-
matt walker - Site Admin
- Posts: 1806
- Joined: Tue Jan 03, 2012 5:50 pm
- Location: North Olympic Peninsula
Re: 6" RMH Build
![]() by Lollykoko » Sat Jul 06, 2013 4:40 pm
by Lollykoko » Sat Jul 06, 2013 4:40 pm
That bench is looking wonderful already, Manny!
You said you are planning to add copper tubing to heat water, didn't you? Part of my procrastination is the desire to put heated water under the floor of two rooms that are built on concrete slab, so I'm wondering what usage you have in mind.
You said you are planning to add copper tubing to heat water, didn't you? Part of my procrastination is the desire to put heated water under the floor of two rooms that are built on concrete slab, so I'm wondering what usage you have in mind.
-

Lollykoko - Posts: 575
- Joined: Sun Jan 08, 2012 9:04 pm
- Location: Howard and Miami Counties, Indiana
Who is online
Users browsing this forum: No registered users and 7 guests