Rocket Mass Heater for my home
Moderator: matt walker
Re: Rocket Mass Heater for my home
![]() by Lollykoko » Thu Jan 26, 2012 1:20 am
by Lollykoko » Thu Jan 26, 2012 1:20 am
Twenty odd years ago I was doing an apprenticeship as a die cast diemaker. That particular night I was working on the lathe, turning out custom core blanks for later precision grinding. The boss came by and got in conversation with my journeyman, asking how I was doing in that area. The journeyman showed him all the job orders I had completed that week, talked about learning to change lathe heads, etc. Boss wanted to know when I'd made my last mistake. It seems he thought the only way to learn was to do something wrong once in a while. 
-

Lollykoko - Posts: 575
- Joined: Sun Jan 08, 2012 9:04 pm
- Location: Howard and Miami Counties, Indiana
Re: Rocket Mass Heater for my home
![]() by matt walker » Fri Jan 27, 2012 3:15 am
by matt walker » Fri Jan 27, 2012 3:15 am
Well Lolly, by your old Boss' measure, I'm a genius by now! Lol.
So, I'm hopeful it's going to work out. I had a small burn in it today, to help dry it out. It's setting up, and after the burn, the areas around the burn chamber were quite dry and seemed solid. It burned the top of the burn tunnel mold away, and so far, the clay is holding it's shape. I think I will continue to dry it slowly by repeating the short burn daily for a few more days. I'm waiting on some materials for the heat riser, so I have a little time to let it set up and then I'll get it outside and really light it off and see how it holds up. I realized it's going to be encased in cob, so even if it cracks here and there, I should be able to stick it back together and build up around it. It started rocketing today and holy cow was it wanting to roar!
So, I'm hopeful it's going to work out. I had a small burn in it today, to help dry it out. It's setting up, and after the burn, the areas around the burn chamber were quite dry and seemed solid. It burned the top of the burn tunnel mold away, and so far, the clay is holding it's shape. I think I will continue to dry it slowly by repeating the short burn daily for a few more days. I'm waiting on some materials for the heat riser, so I have a little time to let it set up and then I'll get it outside and really light it off and see how it holds up. I realized it's going to be encased in cob, so even if it cracks here and there, I should be able to stick it back together and build up around it. It started rocketing today and holy cow was it wanting to roar!
-

matt walker - Site Admin
- Posts: 1806
- Joined: Tue Jan 03, 2012 5:50 pm
- Location: North Olympic Peninsula
Re: Rocket Mass Heater for my home
![]() by matt walker » Mon Feb 06, 2012 6:07 pm
by matt walker » Mon Feb 06, 2012 6:07 pm
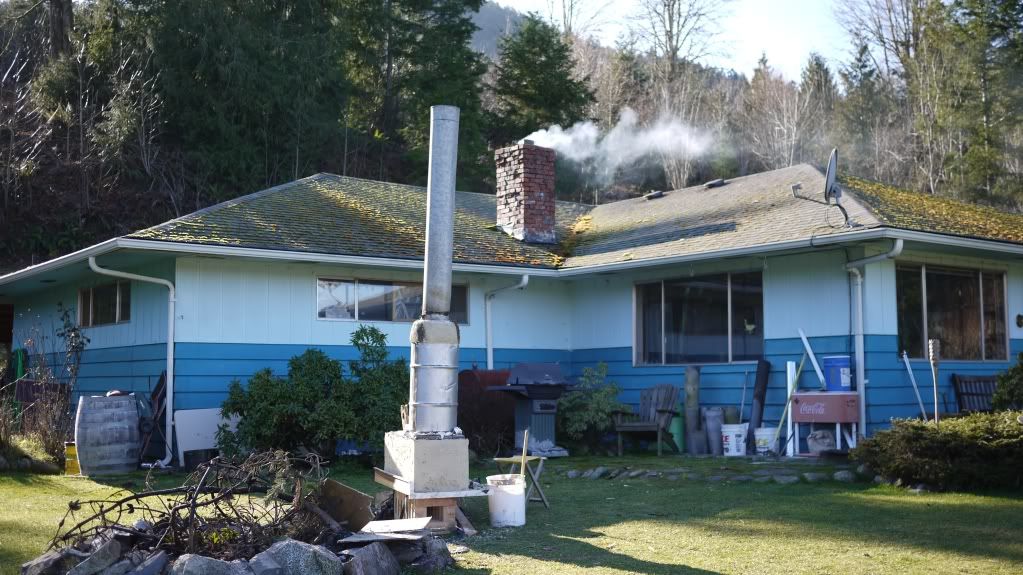
UPDATE: Well, it's in the house burning merrily away. I'm completely exhausted, lots of digging and mixing and carrying heavy stuff all weekend. I've got a big update post coming and lots of photos to share, but first, more mud! Stay tuned.
-
matt walker - Site Admin
- Posts: 1806
- Joined: Tue Jan 03, 2012 5:50 pm
- Location: North Olympic Peninsula
Re: Rocket Mass Heater for my home
![]() by pa_friendly_guy » Tue Feb 07, 2012 2:50 pm
by pa_friendly_guy » Tue Feb 07, 2012 2:50 pm
You get a big AT-A BOY Matt. Congrats. I would love to see some pictures, and hear about how well you think it is heating your place. I know that you said your house had issues with insulation and drafts. The fly wheel effect of the mass of cobb should help to even things out for you some. Good luck
Never doubt that a small group of dedicated people can change the world, indeed it is the only thing that ever has.
-

pa_friendly_guy - Posts: 1502
- Joined: Sun Jan 08, 2012 9:24 pm
- Location: SW Pa They changed me to zone 6a what ever that is. I still figure zone 5
Re: Rocket Mass Heater for my home
![]() by matt walker » Tue Feb 07, 2012 6:22 pm
by matt walker » Tue Feb 07, 2012 6:22 pm
Thank you Guy. It's a huge project, and I'm so excited about it I haven't been online much at all. I promise photos soon, I've taken a lot and will do some step by step posts once I settle down a bit. I got half the mass in yesterday and last night. One more day of digging and cob dancing and hauling and I should be at a point where I can stop for a few weeks and evaluate everything before doing the finish work on the cob structure.
I've decided to abandon my brick finishing idea for now. That can be phase 7, if I decide to go that far. At this point, I'm feeling like it's going to be a huge success. I can't sit on it yet, but even before yesterday's addition of mass, it has the potential to radiate heat equal to the old box stove. We've been having a cold snap, last night at midnight it was about 28* outside, and I had it over 70* about 20' from the stove. Now that half the mass is in, I woke up this morning 6 hours after letting it go out, and the house is 68* at the same location. I can't wait to sit on it!
I'll try to get started on the photo posts this evening.
-
matt walker - Site Admin
- Posts: 1806
- Joined: Tue Jan 03, 2012 5:50 pm
- Location: North Olympic Peninsula
Re: Rocket Mass Heater for my home
![]() by matt walker » Wed Feb 08, 2012 2:09 am
by matt walker » Wed Feb 08, 2012 2:09 am
Okay, here we go....
So, I continued to have little burns in the molded combustion unit in my shop, but I really wanted to get it outside and burn it hot to dry it, and it was too heavy and awkward for me to move alone. I was worried it was too fragile in it's wet state to try to slide in the loader of my tractor, so I felt stuck until I got someone to come over and help me.
Well, I woke up Thursday morning with the light bulb over my head, and felt silly for not thinking of it earlier. I realized I could sling the whole platform the unit was on and pick it with my tractor's loader that way. I did just that, and got it outside up on some blocking, as I wanted to evaluate how it transferred heat downwards. I put a huge stack on it and dressed it up a bit with bricks...
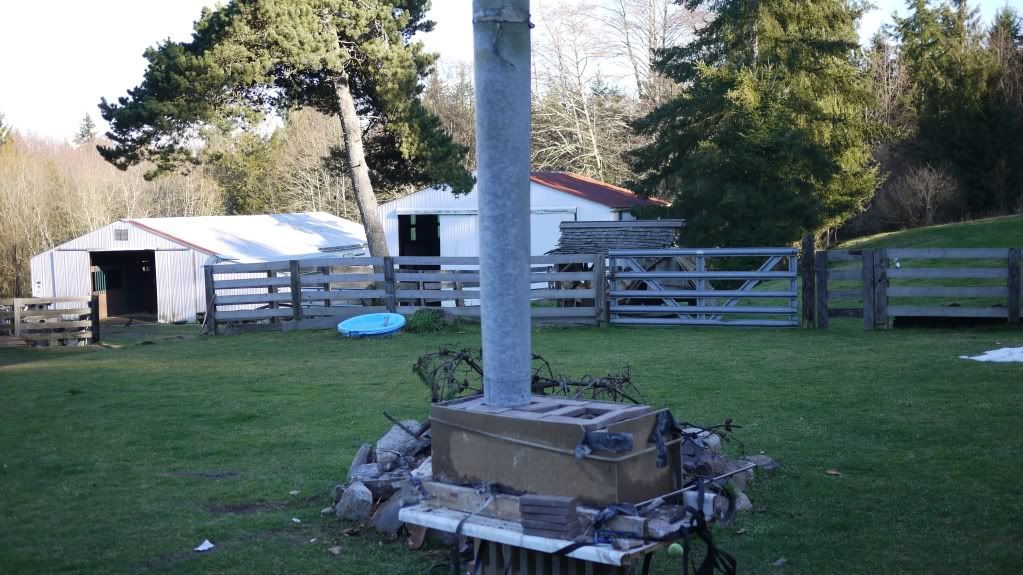
Then, I lit it off, and sat with it for a few hours and just tried to cook the moisture out. I did that Thursday, and on Friday my perlite still hadn't come in at the masonry store, so I went to the garden store and bought 6 cu ft of horticultural perlite, which I found is coarser than the previous batch. With that in hand, I returned home and got the stove burning again, and started on constructing the heat riser.
So, I continued to have little burns in the molded combustion unit in my shop, but I really wanted to get it outside and burn it hot to dry it, and it was too heavy and awkward for me to move alone. I was worried it was too fragile in it's wet state to try to slide in the loader of my tractor, so I felt stuck until I got someone to come over and help me.
Well, I woke up Thursday morning with the light bulb over my head, and felt silly for not thinking of it earlier. I realized I could sling the whole platform the unit was on and pick it with my tractor's loader that way. I did just that, and got it outside up on some blocking, as I wanted to evaluate how it transferred heat downwards. I put a huge stack on it and dressed it up a bit with bricks...
Then, I lit it off, and sat with it for a few hours and just tried to cook the moisture out. I did that Thursday, and on Friday my perlite still hadn't come in at the masonry store, so I went to the garden store and bought 6 cu ft of horticultural perlite, which I found is coarser than the previous batch. With that in hand, I returned home and got the stove burning again, and started on constructing the heat riser.
-
matt walker - Site Admin
- Posts: 1806
- Joined: Tue Jan 03, 2012 5:50 pm
- Location: North Olympic Peninsula
Re: Rocket Mass Heater for my home
![]() by matt walker » Wed Feb 08, 2012 2:17 am
by matt walker » Wed Feb 08, 2012 2:17 am
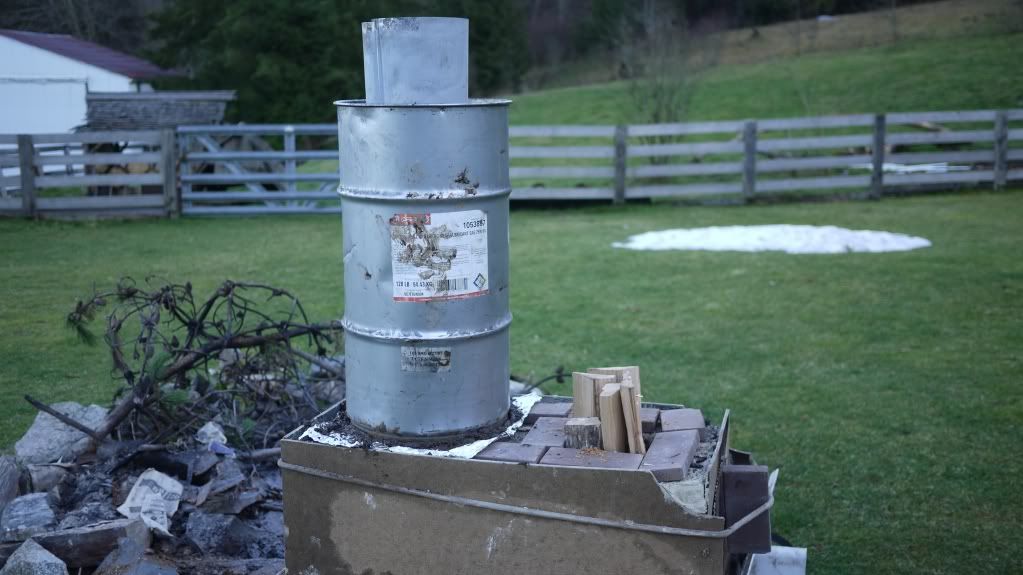
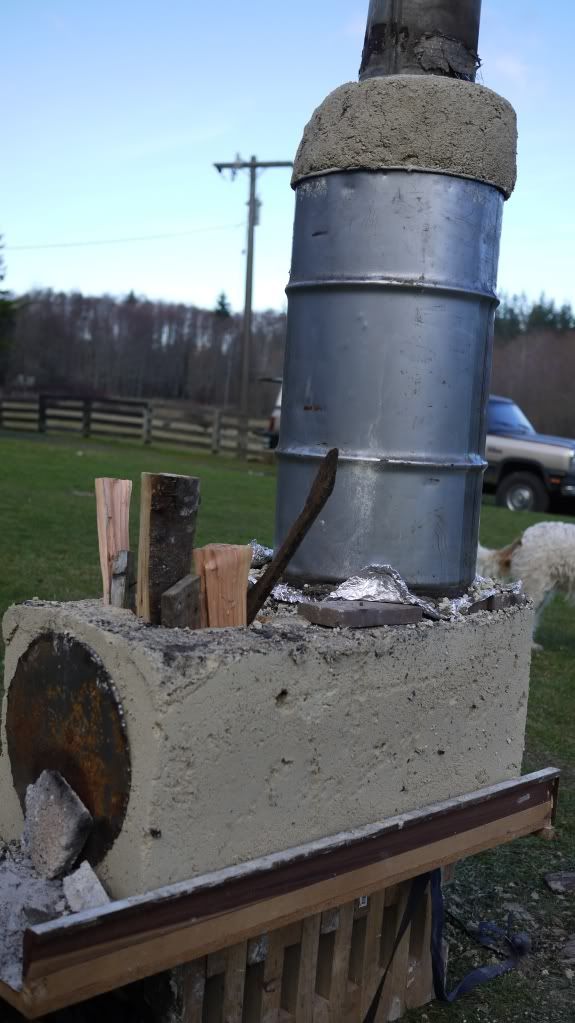
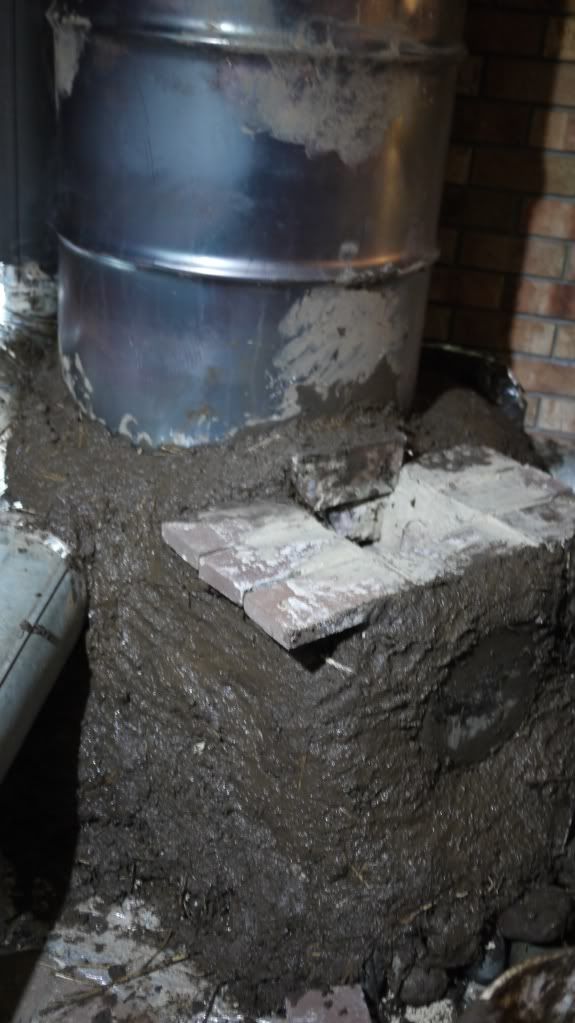
I had planned on doing a square section heat riser to match the burn unit, but of course I was in a hurry and all excited so I started looking around, and found that a little barrel fit over 8" stovepipe with almost 4" clearance all around for the insulation. Perfect! I think in theory the heavy metal of the little barrel is not ideal, just insulation would probably be better, but I went for it because I had it ready to go. I cut the barrel's bottom off with a cold chisel and a hammer, and set it and a piece of burned out stove pipe inside for a mold.
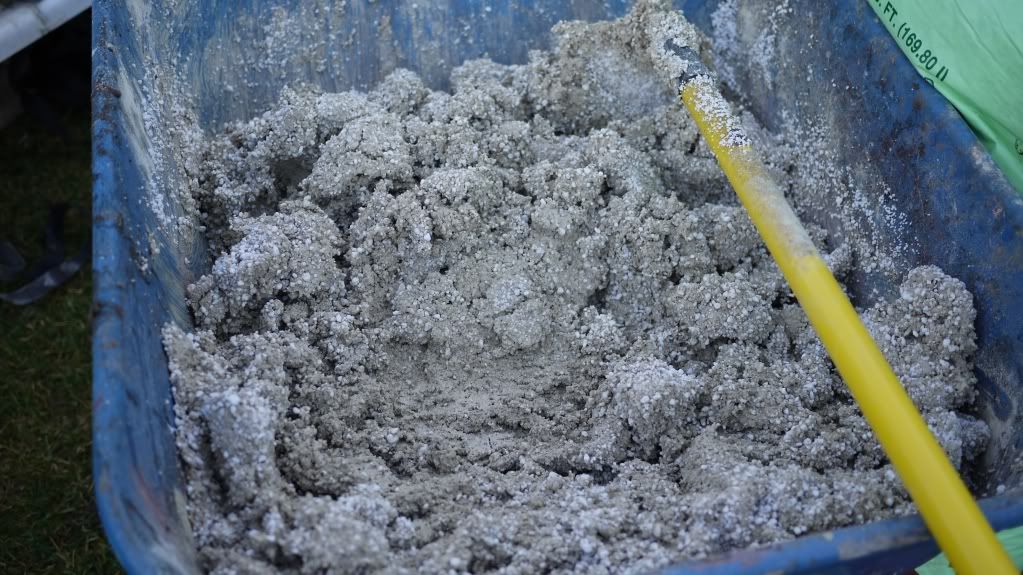
I then mixed up the perlite and fireclay,
and with the stove running, started packing it in between the two. I used a section of pvc pipe with a plugged end to tamp it down, and covered the bottom with foil so it wouldn't bond to the combustion unit. The barrel is a few inches short of the liner, so I just hand molded the top portion.
-
matt walker - Site Admin
- Posts: 1806
- Joined: Tue Jan 03, 2012 5:50 pm
- Location: North Olympic Peninsula
Re: Rocket Mass Heater for my home
![]() by matt walker » Wed Feb 08, 2012 2:27 am
by matt walker » Wed Feb 08, 2012 2:27 am
So, that night I started figuring out the layout, and called a couple friends and asked if either of them would mind stopping by on Saturday and giving me a hand lifting a couple heavy things. Layout....

While thinking about that I kept burning the molds outside to dry them.
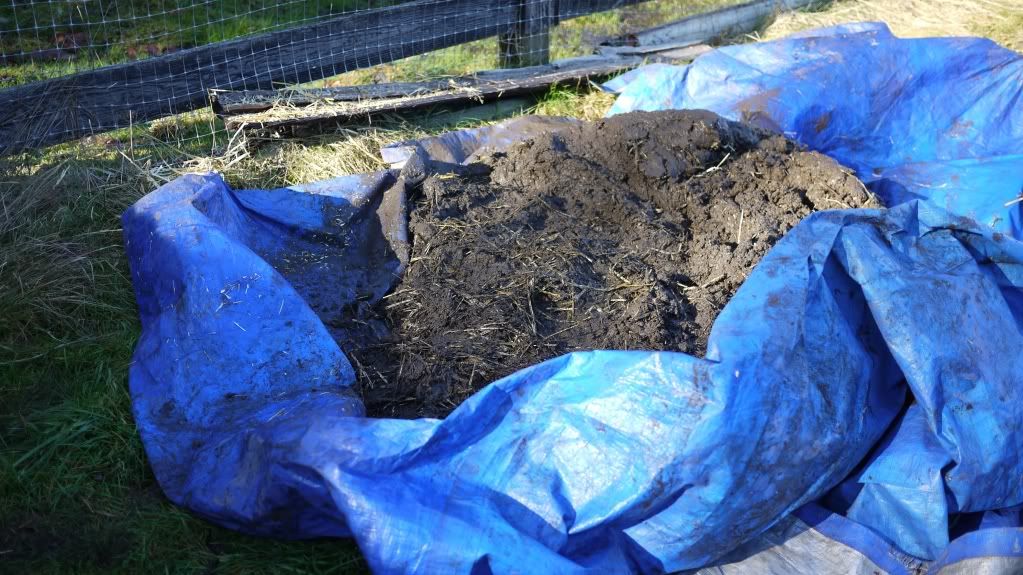
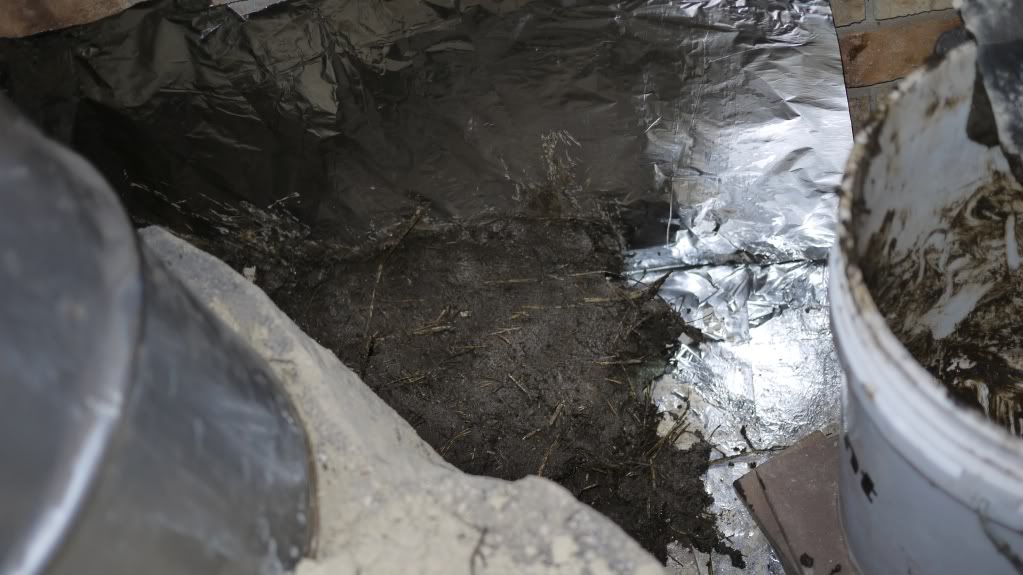
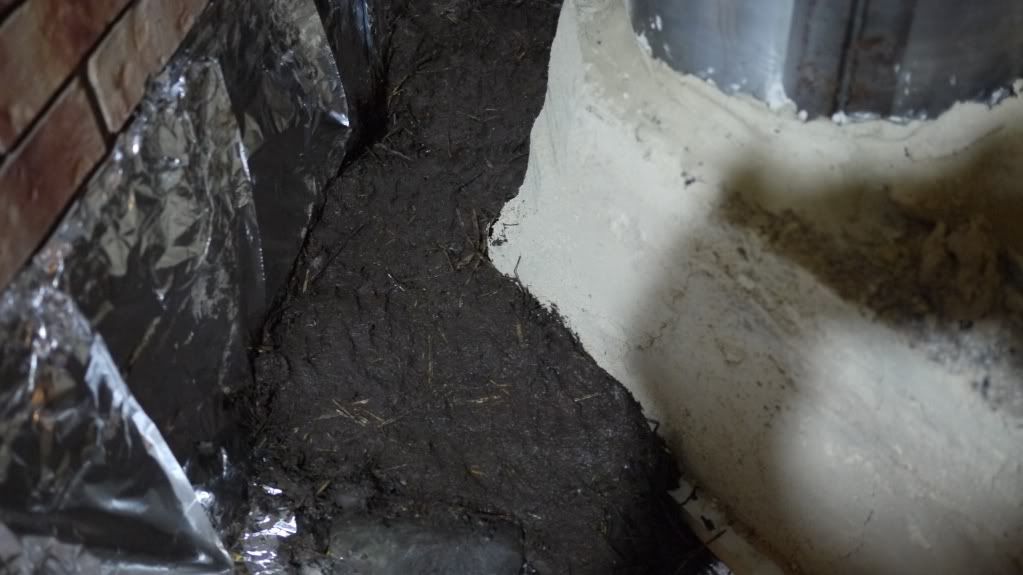
Saturday I woke up to a beautiful day, which helped a lot because I had a lot to do. I started by getting the mold burning, and then went behind the garage where I had found a good clay deposit, and started digging. I used buckets and moved a pretty good little pile of material to a tarp for mixing. I then alternated with tending the fire, and stomping on the "cob", which in my case was gravelly wet clay soil and straw. It seemed to have enough sand and rock to keep it from cracking, so I just added straw and mixed it. Holy cow did I get tired!
By now the burn unit was burning well, and I was curious, so I removed the mold.
That's the bottom of the little barrel covering the window hole...
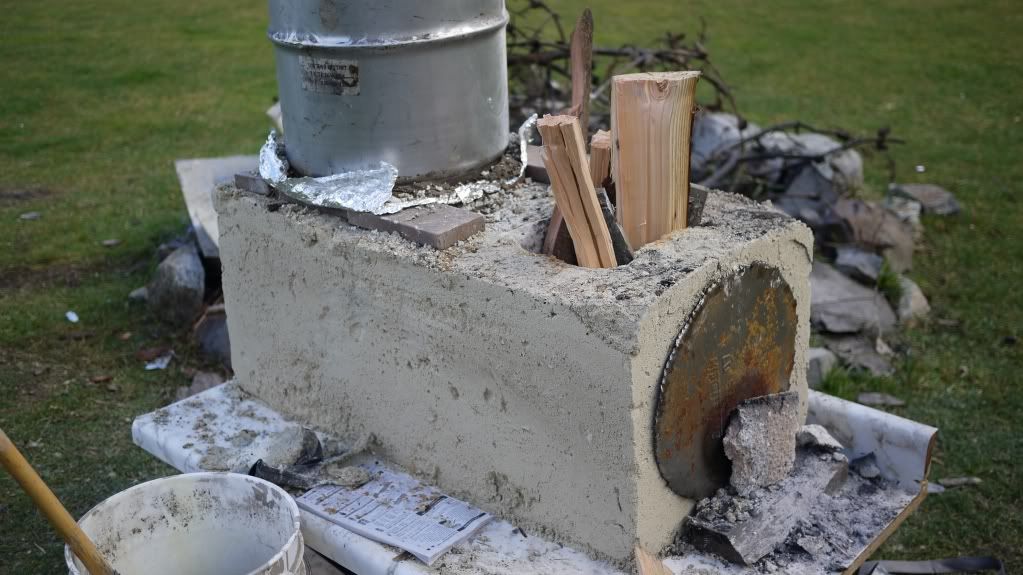
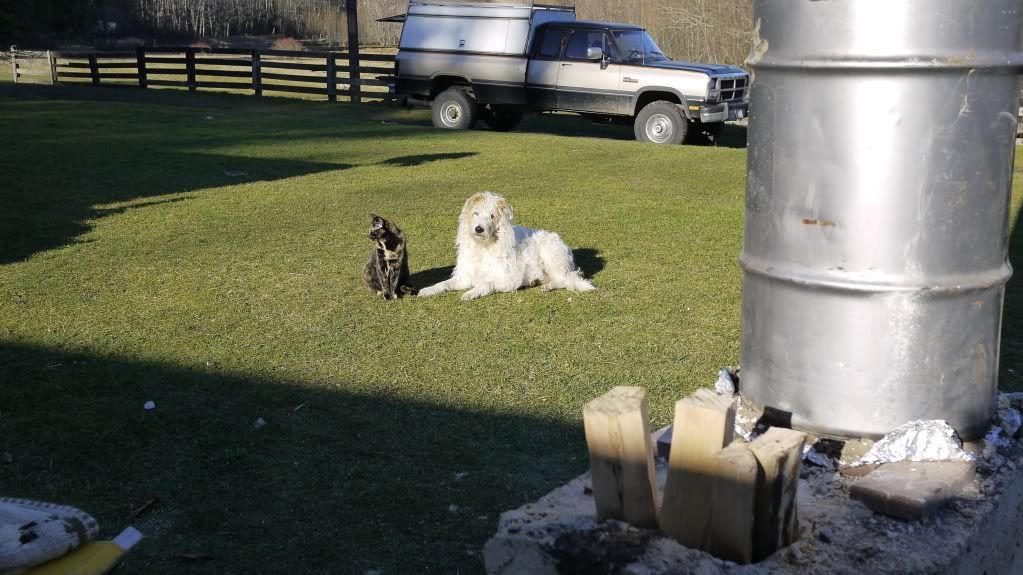
I put a big old stack on it, and had fun juxtaposing the difference in output of the old stove and the rocket stove. Both burning the same fuel, both wide open and hot.
While thinking about that I kept burning the molds outside to dry them.
Saturday I woke up to a beautiful day, which helped a lot because I had a lot to do. I started by getting the mold burning, and then went behind the garage where I had found a good clay deposit, and started digging. I used buckets and moved a pretty good little pile of material to a tarp for mixing. I then alternated with tending the fire, and stomping on the "cob", which in my case was gravelly wet clay soil and straw. It seemed to have enough sand and rock to keep it from cracking, so I just added straw and mixed it. Holy cow did I get tired!
By now the burn unit was burning well, and I was curious, so I removed the mold.
That's the bottom of the little barrel covering the window hole...
I put a big old stack on it, and had fun juxtaposing the difference in output of the old stove and the rocket stove. Both burning the same fuel, both wide open and hot.
-
matt walker - Site Admin
- Posts: 1806
- Joined: Tue Jan 03, 2012 5:50 pm
- Location: North Olympic Peninsula
Re: Rocket Mass Heater for my home
![]() by matt walker » Wed Feb 08, 2012 2:45 am
by matt walker » Wed Feb 08, 2012 2:45 am
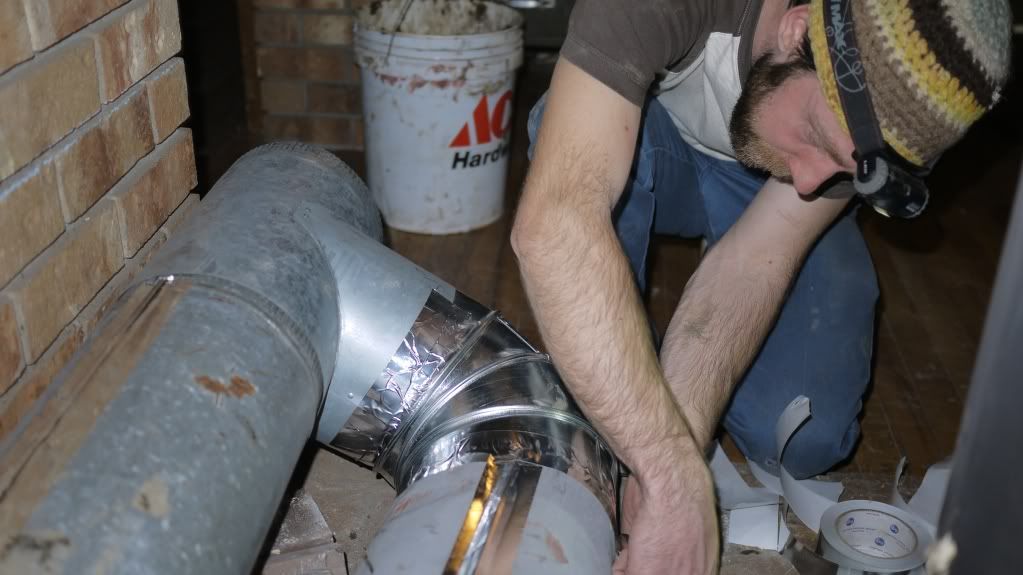
I forgot to mention my helpers...
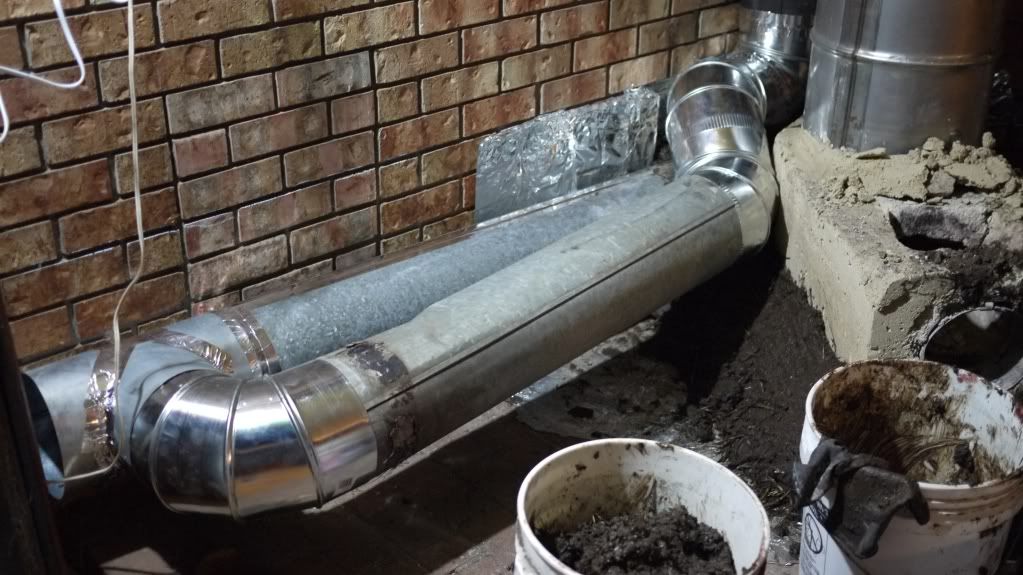
And, as Saturday wore on, I had more help. My neighbor stopped by to help me move the two pieces in the house. We had to slide the old stove to the side,

and then we prepped the area with foil to try to keep the bricks sorta clean of the clay...
Then we were ready to set the pieces in place and level them. I had intended to remove the plinth underneath, but decided to leave it. I burned the core for probably 12+ hours straight with that giant stack on it outside, and the sides of the combustion unit were not even warm. The top of the burn tunnel was comfortably warm to the touch, my cat sat there while the fire was 4" below her raging away. Incredible insulation.
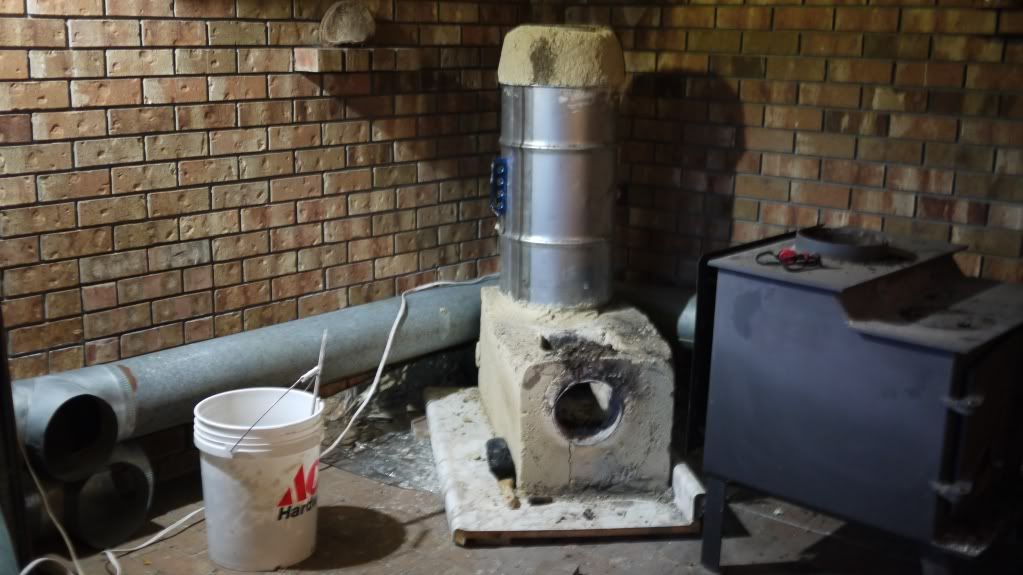
I did trim the edges of the plinth with a sawzall, and then trimmed the molded core with a kitchen knife to allow room for the flue pipe and shape the exhaust port.
And, as Saturday wore on, I had more help. My neighbor stopped by to help me move the two pieces in the house. We had to slide the old stove to the side,
and then we prepped the area with foil to try to keep the bricks sorta clean of the clay...
Then we were ready to set the pieces in place and level them. I had intended to remove the plinth underneath, but decided to leave it. I burned the core for probably 12+ hours straight with that giant stack on it outside, and the sides of the combustion unit were not even warm. The top of the burn tunnel was comfortably warm to the touch, my cat sat there while the fire was 4" below her raging away. Incredible insulation.
I did trim the edges of the plinth with a sawzall, and then trimmed the molded core with a kitchen knife to allow room for the flue pipe and shape the exhaust port.
-
matt walker - Site Admin
- Posts: 1806
- Joined: Tue Jan 03, 2012 5:50 pm
- Location: North Olympic Peninsula
Re: Rocket Mass Heater for my home
![]() by matt walker » Wed Feb 08, 2012 2:53 am
by matt walker » Wed Feb 08, 2012 2:53 am
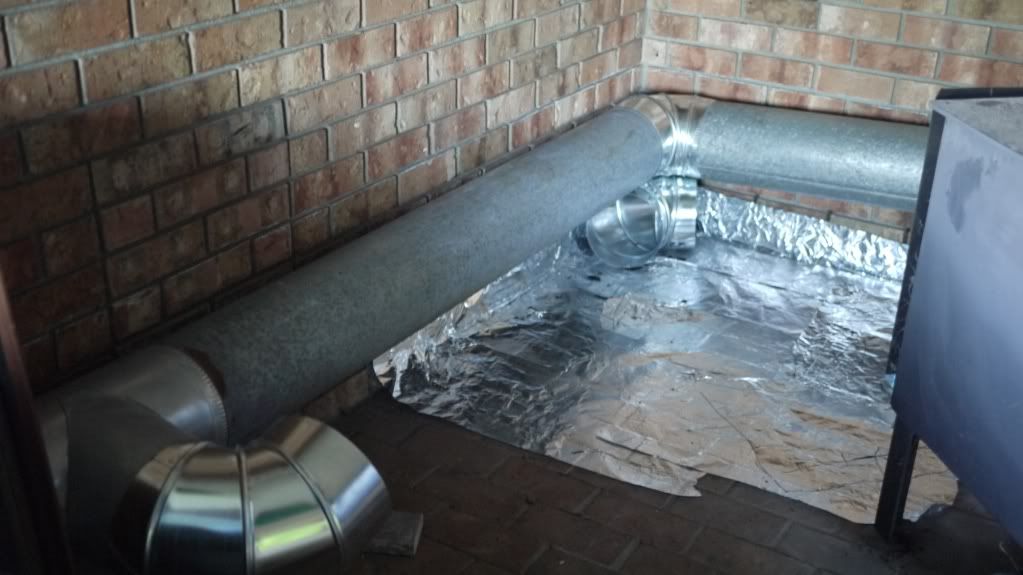
Then, we cobbed the pipes behind the unit in place, and shaped the exhaust port and burn areas so we could set the barrel on.
With that done, we just had to connect the remaining flue and tape it up. My neighbor was a champ, and we got it done quickly because we both wanted to see it fire.
My awesome neighbor...
Once that was done, we took a break and had a beer and toasted to the new stove. Then we lit it off.
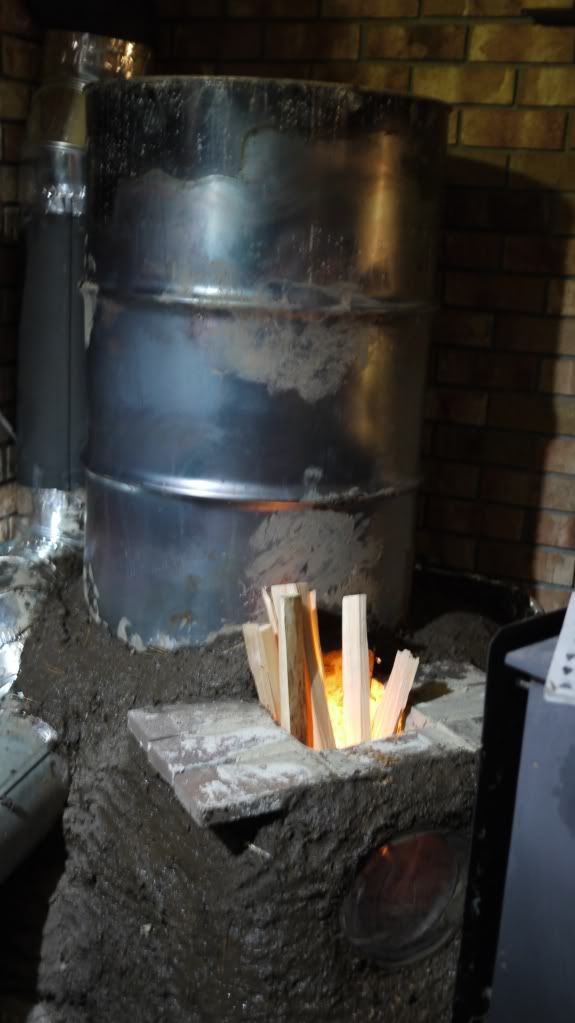
I jumped right to life, and sucked the flame right from the start. I was thrilled, and exhausted. Saturday was a long, long day.
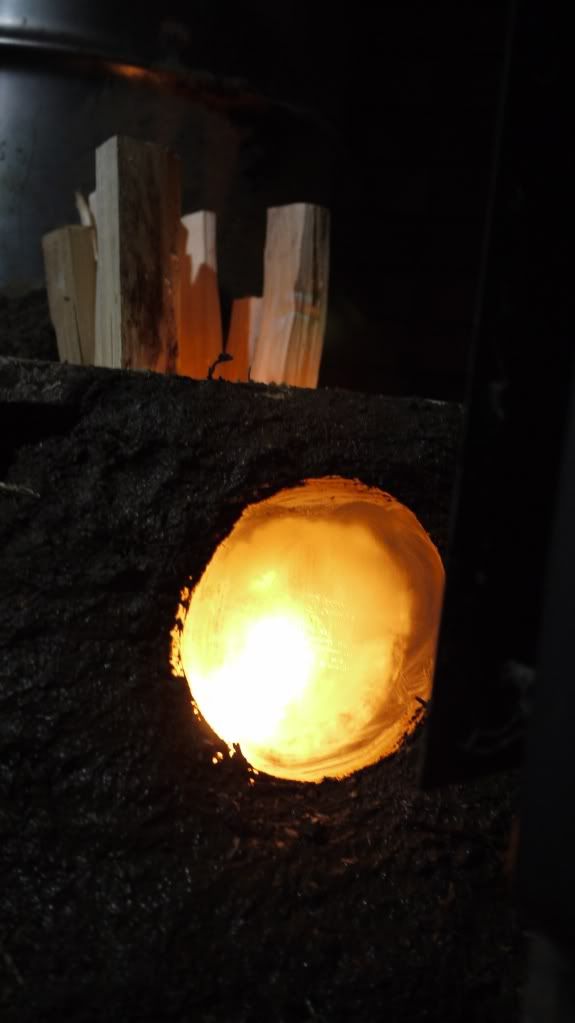
We had a window in there for the test, but I planned to extend the viewing tunnel so we didn't leave it for long. It looked great though. What a way to end that big push.
With that done, we just had to connect the remaining flue and tape it up. My neighbor was a champ, and we got it done quickly because we both wanted to see it fire.
My awesome neighbor...
Once that was done, we took a break and had a beer and toasted to the new stove. Then we lit it off.
I jumped right to life, and sucked the flame right from the start. I was thrilled, and exhausted. Saturday was a long, long day.
We had a window in there for the test, but I planned to extend the viewing tunnel so we didn't leave it for long. It looked great though. What a way to end that big push.
-
matt walker - Site Admin
- Posts: 1806
- Joined: Tue Jan 03, 2012 5:50 pm
- Location: North Olympic Peninsula
Who is online
Users browsing this forum: No registered users and 12 guests