An Inexpensive Hoop House
Well, some of you have seen this before, but I thought I'd share again my technique for building a hoop house. I use it more for Low Tunnels, as the taller houses tend to be sorta flimsy. They do a good job of getting things started in the cold season, but don't expect them to be permanent.
What follows is from two years ago this April. Ive refined it a bit since then, but this is a good starting point:
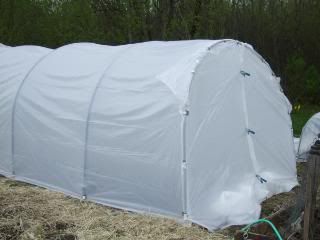
Size of mine is 10'x25', about 7' high at the peak.
---------------------------------------------------------------------------------------------------------
Materials list:
(10) 10' lengths of gray pvc conduit, 3/4" diameter. These are about $1.20 each.
(5) 10' lengths of galvanized EMT conduit, 1/2" diameter $1.70 each.
A little bit of 1" pvc. Gray conduit is better because it's uv stabilized, but I used white as I had some laying around. You probably only need a couple feet, but it's cheap enough to buy a section if you have to. Probably $1.50 or so.
Some duct tape
Plastic covering. I bought fancy clear stuff for the low tunnel from Farmtek, it was pretty expensive. For the hoop house I was on a budget and in a hurry so went to the hardware store and got plastic there. I got 4 mil, in a roll that was 25'x50'. I think 6 mil would be way better but my store didn't have it in wide enough rolls, and it was expensive. I spent about $25 on the plastic. It's not as clear as the expensive stuff, and next year I might spring for good stuff. On the other hand it sure was cheap, so if it gets wrecked in a season I won't mind.
---------------------------------------------------------------------------------------------------------
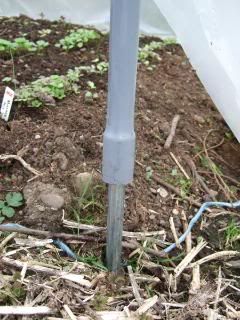
It's all pretty straightforward, the galvanized conduit I use for stakes. I was cutting it but found it's easier to just bend, crease, and break it. I break it in half, so each stake is 5' long. I use a t post driver to pound 'em in about half their length, you could use a hammer if you don't have a driver.
Two lengths of the 3/4" pvc will join to become on 20' hoop. I didn't use any glue, just stuck 'em together. They have a bell coupling on one end for this, easy peasy. Slide the hoops over the stakes. I guess I should talk about layout. I used one hoop every 5 feet, with a 10' width. You could adjust this as needed.
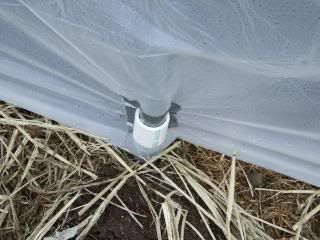
Then, I use pvc shears to cut the 1" pvc into 1" rings, then nip a section of that out to make a clip. The pics will explain what I mean here. I put a little gusset of tape over the plastic where I'm gonna clip it to reinforce it and just snap the plastic on. It's a good idea to experiment with the size of these little guys before you cut a bunch. Longer ones are stronger but harder to clip. The size of the "mouth" is really important. Doesn't need to be super hard to clip on, but needs to hold on fairly tightly to be able to hold up to wind.
I do the ends first, and leave a little extra in the middle so I can cut a slit for a door. Then the plastic goes over the hoops and I clip at all the bottoms of the hoops and around the hoops at the ends, but it's unfastened in the middle.
That's it. If it's really windy where you live this will maybe not work, but you could do more clips and supports if needed. A lot of photos show others using all kinds of cross bracing and stuff, but my metal stakes going up into the hoops a couple feet at least gives the whole thing a pretty rigid structure. It feels pretty dang stable.
It's really awesome hanging out in there, today was light overcast and kinda windy with a little rain, it was 75* or so in there.
Here's how I close the "door." Those are little spring alligator clamps, you could use those metal office supply clips just as well. I don't know what they're called, but you know what I mean...
Here's the clips...
Here I slid the hoop up to show the stake, but usually the hoop is all the way down to the ground...
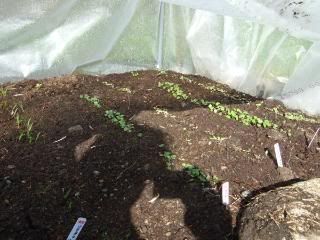
Some greens I planted a week ago or so....
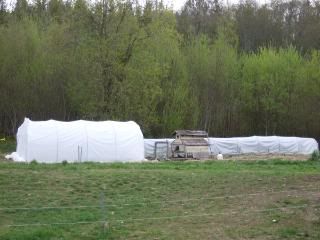
Eyesores....
What follows is from two years ago this April. Ive refined it a bit since then, but this is a good starting point:
Size of mine is 10'x25', about 7' high at the peak.
---------------------------------------------------------------------------------------------------------
Materials list:
(10) 10' lengths of gray pvc conduit, 3/4" diameter. These are about $1.20 each.
(5) 10' lengths of galvanized EMT conduit, 1/2" diameter $1.70 each.
A little bit of 1" pvc. Gray conduit is better because it's uv stabilized, but I used white as I had some laying around. You probably only need a couple feet, but it's cheap enough to buy a section if you have to. Probably $1.50 or so.
Some duct tape
Plastic covering. I bought fancy clear stuff for the low tunnel from Farmtek, it was pretty expensive. For the hoop house I was on a budget and in a hurry so went to the hardware store and got plastic there. I got 4 mil, in a roll that was 25'x50'. I think 6 mil would be way better but my store didn't have it in wide enough rolls, and it was expensive. I spent about $25 on the plastic. It's not as clear as the expensive stuff, and next year I might spring for good stuff. On the other hand it sure was cheap, so if it gets wrecked in a season I won't mind.
---------------------------------------------------------------------------------------------------------
It's all pretty straightforward, the galvanized conduit I use for stakes. I was cutting it but found it's easier to just bend, crease, and break it. I break it in half, so each stake is 5' long. I use a t post driver to pound 'em in about half their length, you could use a hammer if you don't have a driver.
Two lengths of the 3/4" pvc will join to become on 20' hoop. I didn't use any glue, just stuck 'em together. They have a bell coupling on one end for this, easy peasy. Slide the hoops over the stakes. I guess I should talk about layout. I used one hoop every 5 feet, with a 10' width. You could adjust this as needed.
Then, I use pvc shears to cut the 1" pvc into 1" rings, then nip a section of that out to make a clip. The pics will explain what I mean here. I put a little gusset of tape over the plastic where I'm gonna clip it to reinforce it and just snap the plastic on. It's a good idea to experiment with the size of these little guys before you cut a bunch. Longer ones are stronger but harder to clip. The size of the "mouth" is really important. Doesn't need to be super hard to clip on, but needs to hold on fairly tightly to be able to hold up to wind.
I do the ends first, and leave a little extra in the middle so I can cut a slit for a door. Then the plastic goes over the hoops and I clip at all the bottoms of the hoops and around the hoops at the ends, but it's unfastened in the middle.
That's it. If it's really windy where you live this will maybe not work, but you could do more clips and supports if needed. A lot of photos show others using all kinds of cross bracing and stuff, but my metal stakes going up into the hoops a couple feet at least gives the whole thing a pretty rigid structure. It feels pretty dang stable.
It's really awesome hanging out in there, today was light overcast and kinda windy with a little rain, it was 75* or so in there.
Here's how I close the "door." Those are little spring alligator clamps, you could use those metal office supply clips just as well. I don't know what they're called, but you know what I mean...
Here's the clips...
Here I slid the hoop up to show the stake, but usually the hoop is all the way down to the ground...
Some greens I planted a week ago or so....
Eyesores....